Random Scenario Generator
Scenario Briefing
Battlefield Archetype
Trench Lines
Behind No Man's Land lies a system of interconnected Trench Lines, often several miles thick. Trench Lines are made up of interlinked trenches that are deep enough to shield most warriors from enemy fire. Because of this combat usually takes place in the trenches themselves, though sometimes a brave warrior will risk clambering out of a trench and running across open ground in order to outflank a strong enemy position.
Trench Lines Terrain Pieces
The players roll-off (▶ see Rolling-Off ) , and the winner sets up the terrain for the game. The terrain pieces for a game taking place in No Man's Land must be chosen from the following list:
- Trenches
- Ruined Corners
- Areas of Dangerous Terrain (barbed wire, swampy ground, etc)
- Area of Difficult Terrain (craters, rubble, fallen trees, etc)
- Landmarks (statues, shrines, altars, etc)
Number of Terrain Pieces
You will need enough Trenches to reach from one edge of the battlefield to the opposite edge. In addition to the trenches, you will need 2 pieces of each other sort of terrain. Count pieces that are more than 8" across or more than 8" long as being 2 pieces of terrain towards this number rather than only 1.
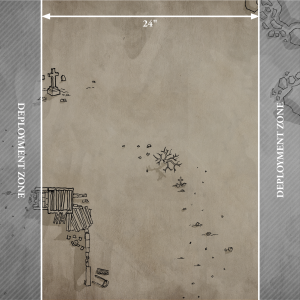
Terrain Setup
Any trenches that are going to be used for the game must be set up first. The first trench must be set up so that it enters from one edge of the Battlefield, and subsequent trenches must connect with an existing trench. Once all of the trenches have been set up they must extend from the edge of the Battlefield, from where the first trench was placed, to the opposite edge of the Battlefield, so that a model could enter on one edge and exit off the other without ever having to leave a trench. After all of the trenches have been set up, any other terrain can be set up anywhere on the battlefield that is at least 1" from any trenches and 3" away from any other Terrain Pieces.
Victory Conditions
Take and Hold
After the terrain has been set up, the players must set up 6 Objective Markers. The players roll-off, and then alternate setting up the Markers, one at a time, starting with the winner of the roll-off. Objective Markers must be set up more than 6" from the edge of the battlefield or a Deployment Zone, and more than 6" away from any other Markers. If this makes it impossible to use all of the Markers, discard any that cannot be set up.
A player wins this scenario immediately if the opposing Warband flees. Otherwise, the player with the most Victory Points at the end of the game is the winner.
At the end of the third Turn each player scores:
- 3 VP for each Objective Marker they control. A player controls an Objective Marker if there are more friendly models within 1" of it than there are enemy models.
At the end of the game each player scores:
- 5 VP for each Objective Marker they control. A player controls an Objective Marker if there are more friendly models within 1" of it than there are enemy models.
- 1 VP for each Glorious Deed they completed.
Game Length
Roll a D6 at the end of the fifth Turn. On a 1 or 2, the game ends immediately. On a 3 or more, the game will end at the end of the sixth Turn.Deployment
Tunnels
The players roll-off. The winner of the roll-off chooses which Deployment Zone will be theirs. The other Deployment Zone is their opponent's. The winner must then set up a Tunnel Marker in the loser's half of the battlefield and more than 6" from the loser's Deployment Zone. The loser must then set up a Tunnel Marker in the winner's half of the battlefield and more than 6" from the winner's Deployment Zone.
The players must then split their Warbands into two groups with an equal number of models. If a player has an odd number of models in their Warband, the extra model must go in the first group. The first group is the starting group, and the second group is their reinforcements.
The players then alternate deploying their models in their starting group one at a time, starting with the player who has more models in their Warband (roll-off if both players have the same number of models). Models must be set up wholly within their own Deployment Zone. Infiltrators can deploy normally or by using their special deployment rules, but must be set up more than 8" from the opposing player's Tunnel Marker.
Starting from the first Turn, the players can Activate the models from their reinforcements group, as well as the models that were deployed at the start of the battle (the reinforcements and previously deployed models can be Activated in any order). When they Activate a reinforcement, they must deploy it within 6" of their Tunnel Marker and more than 1" from any enemy models, even if it is an Infiltrator. The player can then carry out the rest of the model's Activation normally except that the model cannot Dash. Both players can choose to hold back reinforcements if they wish to, but any that are not deployed by the end of the third Turn are treated as having been taken Out of Action (the tunnels have collapsed!).
Infiltrators can deploy normally or by using their special deployment rules, but must be set up more than 8" from the opposing player's Tunnel Marker.