Don't Breathe
| Players | Even Match |
| Infiltrators | Special |
| Battle Length | 5-6 Turns |
Beware of poison gas as you assault enemy bunkers or drive back the attackers with the power of mustard gas!
Forces
Before picking their Forces, the players must decide who is the attacker and who is the defender in this scenario. The player with the most models in their Warband (ignoring their Threshold Values or Field Strength) is the attacker in this scenario and their opponent is the defender. If both players have the same number of models, they roll-off and the winner decides who will be the attacker and who will be the defender.
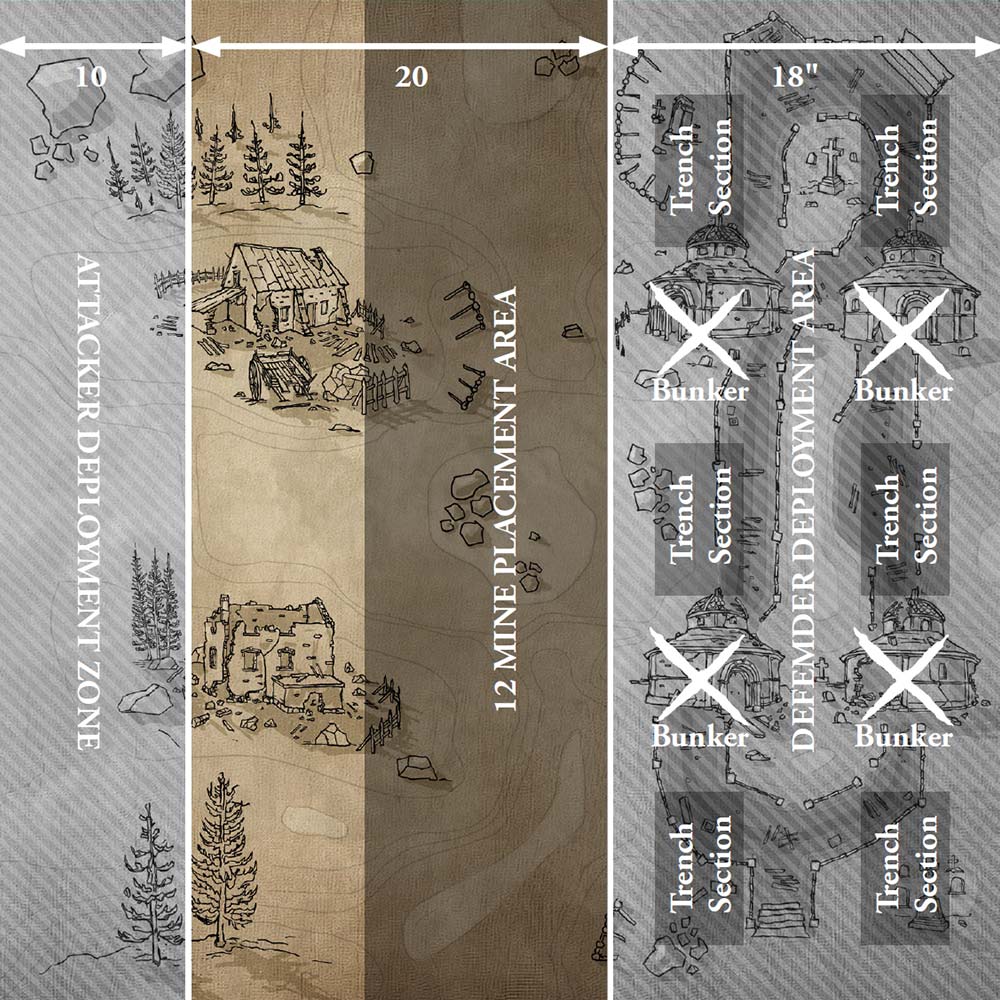
The Battlefield
The players roll-off and the winner sets up the terrain for the game. This scenario uses the No Man’s Land battlefield archetype and requires a battlefield that is 48" by 48". When setting up the terrain for this scenario, do not set up any terrain in either Deployment Zone.
Deployment
The players roll-off. The winner of the roll-off chooses which Deployment Zone will be theirs. The other Deployment Zone is their opponent’s. Before any models are deployed, the defender must set up their trench lines, Bunkers, and Gas Mine Markers as described below. The players then alternate deploying their models one at a time, starting with the attacker. The players alternate deploying their models one at a time, starting with the attacker. The defender may deploy a maximum of 6 models. The attacker may deploy a maximum of 6+D3 models. Any models that cannot be deployed are available as reinforcements (see below). Models must be set up wholly within their own Deployment Zone. If a player runs out of models to set up, the other player sets up all their remaining models, one after another, until they have none left. Once the players have set up their models, deployment ends, and the game begins.
Defending Trench Lines
The defender must set up six Trench sections that are at least 8" long at the locations shown on the map. They can add additional Trench sections of any size if they wish to, but all must be set up wholly within their Deployment Zone and more than 3" from the centre of where any of the Bunker Markers will be placed.
Bunker Markers
The Bunker Markers represent heavily armoured entrenchments. After the Defender has set up their Trenches, they must set up four terrain pieces on top of where a Bunker Marker will be set up. They must use Intact Building terrain pieces if available (if they run out of Buildings, they can use whatever terrain pieces they wish). Place each Bunker Marker anywhere on the terrain piece that covers its starting position; the whole of the terrain piece is treated as the Bunker in this scenario.
Gas Mine Markers
After the defender sets up their Trenches, they can set up 12 Gas Mine Markers. At least 8 of the Gas Mine Markers must be placed wholly within the Gas Mine Placement Area. Up to 4 can be placed wholly within the defender’s Deployment Zone. After setting the Gas Mine Markers up, the defender must secretly write down which 4 of the Gas Mine Markers are duds. All of the other Gas Mine Markers are live and have the
- Choking Mines: As soon as a model moves within 3” of a Gas Mine Marker, temporarily halt its move. The defender must then reveal if the Gas Mine Marker is a dud. If it is, nothing happens. If it is a live mine, it detonates in the same way as if the model had moved into contact with a Marker with the MinedKeyword. The Gas Mine Marker is then removed and replaced with a Gas Cloud Marker. The moving model can then carry on with its move as long as it wasn’t taken Down or Out of Action. Models with the Keyword only trigger a Gas Mine Marker if they finish a move in contact with it (they can fly across it without setting it off ).
- Gas Cloud Markers: Place 1 Blood Markernext to each model that is within 6" of the centre of a Gas Cloud Marker when it is set up. In addition, place 1Blood Markernext to a model that is within 6" of the centre of a Gas Cloud Marker when the model is Activated.
- Detonating Gas Cloud Markers: A model can choose a Gas Cloud Marker as the target for an attack with a weapon that has the BlastorFireKeyword. If the attack is a Success or a Critical Success, the Gas Cloud Marker explodes. A Gas Cloud Marker will also explode if it is caught in the radius of an attack with theBlastKeyword.
- Gas Cloud Explosions: When a Gas Cloud Marker explodes, make an Injury Roll for each model within 3" of the Marker as if they had been hit by a weapon with the +2 Injury DiceandFireKeywords. If the model is not taken Out of Action by the Injury Roll, it is blown away D3" in a straight line directly away from the centre of the Marker. The model stops if it is blown into another model, Impassable terrain, or terrain it cannot cross without having to Climb. The Gas Cloud Marker is then removed from the battlefield.
Infiltrators
Infiltrators can deploy normally or by using their special deployment rules. Attacking models that deploy using their special deployment rules cannot deploy within 8" of a Bunker Marker.
Game Length
At the end of the fifth Turn, the attacker rolls a D6. On a 1 or 2, the game ends immediately. On a 3 or more, the game will end at the end of the sixth Turn.
Victory Conditions
A player wins this scenario immediately if there are no enemy models on the battlefield, or if the opposing Warband flees (typically due to failing a Morale Check). Otherwise, the player with more Victory Points at the end of the game is the winner.
- At the end of each Turn, the defender scores 1 VP for each Trench section that is at least 8" long and has one or more defending models in it. If there are no attacking models in the Trench section, the defender scores 2 VPs instead of 1.
- At the end of each Turn, the attacker scores:
- 2 VPs for each trench section that is at least 6" long and has one or more of your models in it. If no defending models are in the trench section, the attacker scores 3 VPs instead of 2.
- 2 VPs for each Bunker that was destroyed by a Demo Charge that Turn.
- At the end of the game each player scores 1 VP for each Glorious Deed they completed and 4 VP for each Bunker they control. A player controls a Bunker if there are more friendly models within 1" of it than there are enemy models.
Reinforcements
At the start of each Turn, the players roll-off. The winner rolls a D3 to see how many reinforcement models each of the players can deploy. The players then alternate deploying reinforcement models, one at a time, starting with the player that won the roll-off. Reinforcement models must be deployed touching the edge of the battlefield, wholly within their Deployment Zone, and more than 8" from the closest enemy model. If a player runs out of reinforcement models, the opposing player can set up any remaining reinforcements they have available up to the limit set for the Turn. Players must set up reinforcements if they have any available and are allowed to do so (you can’t choose to hold them back).
Destroying Bunkers
Models on the attacking side with the
- Place Demo Charge: A model that has Demo Charges and is in contact with a Bunker can take an Actionto place the Demo Charge on the Bunker. Once it does so, it no longer has the Demo Charge but can now use the Detonate Demo ChargeAction.
- Detonate Demo Charge: A model that has set Demo Charges can take an Actionto detonate the Demo Charge. It can take theActionat any time during the game, and can wait one or more Turns before it does so if desired (this gives the model a chance to move away so it does not get caught in the explosion). When it finally takes theAction, make an Injury Roll with theIgnore ArmourKeyword for every model within 3" of the Bunker. The Bunker Marker is then removed, and the terrain piece it was on is no longer considered a Bunker. Note that if a model that has placed a Demo Charge is taken Out of Action, it will not be possible to detonate the Demo Charge.