Storming the Shores
| Players | Attack / Defend |
| Infiltrators | Special |
| Battle Length | 5-6 Turns |
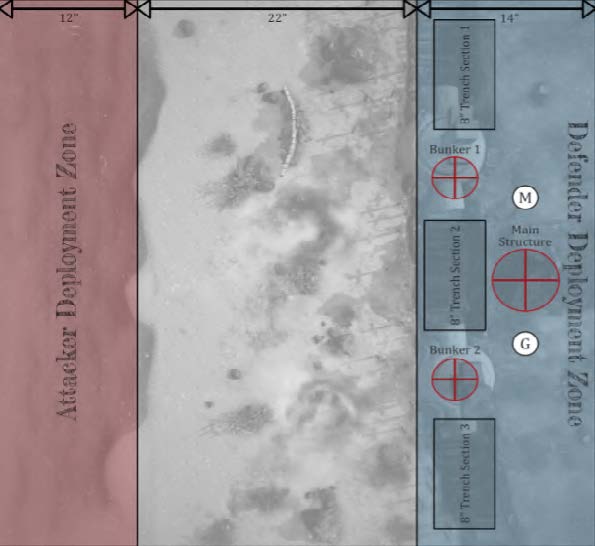
The shoreline of this beach, river, lake or swamp stands as a vital stronghold - its bunkers, trenches and heavy emplacements forming an unyielding wall against invasion. Guarding a crucial supply route, the defenders rely on their fortifications and firepower to hold the line with minimal troops, confident in the terrain’s advantage. Yet, the attackers have taken note of the thinly stretched defences, massing their forces in overwhelming numbers to breach the coastal bastion. The horizon brims with movement, the tide of war rolling in to test the strength of the shoreline’s iron grip.
Forces
The player with the higher number of models is the Attacker. The Attacker must declare the size of their warband, up to sixteen models max. If the Attacker has two or fewer
The Battlefield
The game is played on a standard-size battlefield (we suggest 4’ x 4’).
The Defender places three 8”-long Trench sections in their Deployment Zone. They can be placed as the Defender wishes and can be continuous. However, in the division between each of the three trench sections the Defender must place a bunker model (as indicated by the small Red Markers on the map) of at least 4” x 4” and up to 3” high, so that models of up to 75mm tall may enter the bunker’s interior.
The Defender must place a Main Structure in the location indicated on the map by a large Red Marker. This structure can be a church, a large bunker, a tower etc. It must be at least 6” x 6” and up to 6” high, so that models of up to 150mm tall may enter the building’s interior.
The Main Structure and the bunkers are the Objectives of the scenario, hereafter referred to as Objective Buildings, and score Victory Points (VPs).
The Defender then places three defence works (sandbags, barricades, low wall etc.) each of which counts as a defended obstacle and is at least 4” long horizontally. They are max 1” high. Use the following instructions to deploy these defence works.
- Within 18” of the centre of the battlefield (measured to the centre).
- At least 12” away from another defence work (measured from the centre).
- Not within or surrounded by Impassable terrain.
The Defender places either a Gun Turret or a Mortar, represented by a circled G and a circled M, respectively, on the scenario map, in any location within their deployment zone. Once placed, neither of these can be moved during the game. See the Field Artillery rules for the weapons’ profile and specifications.
Fill the rest of the battlefield with terrain in the usual way, using models such as barricades, ruined buildings, trees, sandbags etc.
Deployment
The player with the higher number of models is the Attacker. The other deployment zone will be their opponent’s, as the Defender, with half the number of models the Attacker has declared.
The Defender starts by deploying their models and also placing the Gun Turret (or Mortar) where they wish according to the parameters set below. After the Defender has deployed their models, the Attacker deploys theirs.
Models must be set up wholly within their own deployment zone.
Once the players have set up their models, deployment ends and the battle begins.
Infiltrators
Infiltrators can be used in this scenario but they cannot be within 8” of any of the Defender’s Objective Buildings.
Game Length
At the end of the fifth turn, the Attacker rolls 1D6. On a roll of 1-2, the battle ends. Otherwise, the game lasts for six turns.
Victory Conditions
If one warband is wiped out completely or loses their Morale test, the game ends and the opposing warband wins. Otherwise, keep a running tally of Victory Points for both sides. The players accumulate VPs as follows:
- The players score five VPs for each Objective Building that they have taken control of. The Attacker scores two VPs for each Objective Building they have destroyed.
- The players control an Objective Building if the total number of models from their warband (that are wholly within that building) is higher than the total number of enemy models within 1” of the Objective Building. A model is considered wholly within a building if it is entirely within the edges of the building’s footprint, as agreed by the players.
- The Attacker destroys an Objective Building if at least one of their Elitemodels that is wholly within the building plants an explosive charge. The model can plant the explosive charge with an Action (no roll required) but upon doing so, the Activation of the model ends. In any following turn, if theElitemodel is activated and moves at least 1” outside the building’s footprint (previously accorded by the players), the Objective Building is immediately destroyed and any other model (friend or foe) that is still wholly within the building must immediately roll on the Injury Chart, ignoring armour. If theElitemodel is taken Out of Action before its next Activation, the explosive charge does not go off.
If you are playing a Campaign, the Winner gains 5 Victory Points.
Calculate VPs at the end of the game for both players and add them together. The player with the higher number of VPs wins, otherwise the game is a draw. However, the following conditions can alter the tides of battle, granting the win regardless of the VPs a player may have accumulated:
- If the Attacker takes control of the Main Structure Objective Building for two full consecutive turns, they win the game regardless of the VPs the Defender may have.
- If the Defender takes all of the Attacker’s Elitemodels Out of Action, they win the game regardless of the VPs the Attacker may have.
If either of these two victory conditions are met at any point during the game, it is considered a decisive win for the respective player and the game immediately ends.
Gun Turret
Gun Turret
| Range | 24" |
| Hands | 2 Hands (Ranged) |
| Modifiers | 3 Attacks, +1D to Hit, +1D to Injuries |
CRITICAL, RISKY
The Gun Turret can’t be moved. A model that is in base contact with the Gun Turret is considered to be armed with it. Only one model can be armed with the Gun Turret at a time. The model must be able to use Ranged weapons to arm themselves with the Gun Turret. While using the Gun Turret, the model can’t take any other
The Gun Turret can make three Attack Actions instead of one, as
A model can attempt to unjam the Gun Turret with an
After making three attacks, consecutively or not, by the same model or not, the Gun Turret must be reloaded as a
The Gun Turret rolls attacks with
The model armed with the Gun Turret is considerably exposed to enemy fire. Enemies add
Mortar
Mortar
| Range | 36" |
| Hands | 2 Hands (Ranged) |
| Modifiers | Blast 3" |
SHRAPNEL, RISKY, BLAST (X)
The Mortar can’t be moved. A model that is in base contact with the Mortar is considered to be armed with it. Only one model can be armed with the Mortar at a time. The model must be able to use Ranged weapons to arm themselves with the Mortar. While using the Mortar, the model can’t take any other
Attacking with the Mortar is considered as a
If the bomb lands exactly on top of any model, roll with 3D6 on the Injury Chart and add the dice together! Other models hit by the projectile roll on the Injury Chart as standard. Any model hit, but not taken Out of Action, by this attack is blown D3” directly away from the point of impact (roll for each model separately), stopping if they hit other models/buildings/objects. This attack has the Keyword
Roll injuries for models that would benefit from Cover from the perspective of the
Unforseen Events
These rules represent the treacherous and often unforeseeable tides of war that can suddenly shift the battle unexpectedly. Starting on the second turn of combat, roll 1D6. On a roll of 1-3, a random event occurs, otherwise the game continues until the start of the next turn, when another roll will be required. These events will always occur at the start of the combat turn, before any model Activation (unless stated otherwise).Upon the occurrence of a random event, roll another 1D6 for the Unforeseen Events chart below to see what exactly happens and follow the directions. No more than one random encounter will ever take place in a single game, so after a random encounter is rolled, a player no longer needs to roll at the start of a combat turn. The entries below refer to the corresponding number rolled and its respective effects:
1. Rising Fog
Heavy fog covers the entire combat zone, drastically limiting visibility for all models. All Ranged Attacks have their total range halved, according to the weapon’s profile and respective modifiers that may have been applied (such as scopes etc.) The fog lasts for two turns before it dissipates.
2. Striding Mercenary
A Mercenary appears on the ridge overlooking the shore. Witnessing the unfolding carnage, they decide to seize the opportunity and offer their services to the warband with the most Glory Points currently accumulated (if both warbands have the same number of points, roll-off 1D6 to see whom they offer their help to. On a roll of 1-3, the Attacker wins, and a roll of 4-6, the Defender wins the roll-off ). The Mercenary will offer their services to the warband for a single turn, even if they have already hired their maximum number of Mercenary models for 1 Glory Point.
You can choose any of the Mercenary units available to your warband and immediately deploy them at least 6” away from any other model in the battlefield, but not within the opponent’s Deployment Zone. You can also deny the Mercenary’s services if you don’t have the required amount of points to pay them.
At the end of the turn, the warband that they aided must pay them their required amount of Glory Points before they leave the battlefield. If the warband cannot (or will not) meet the Mercenary’s standard, they leave, but not before taking out their frustration on a random member of the warband (only choose among members of the warband who haven’t been taken Out of Action yet). Roll directly on the Injury Chart for this member, according to the Mercenary’s profile statistics for the attack (the opponent chooses which attack was used), applying any applicable modifiers.
3. Unearthed Relics
Relics are suddenly unearthed in the battlefield. Each player places two Objective Markers to represent the relics, for a total of four, each at least 6” away from any Deployment Zone, at least 6” away from each other and at least 6” away from any model. The relics cannot be placed on impassable terrain or surrounded by it. A model that comes into base contact with the relic claims it. The model’s owner decides if it is a holy or unholy relic, according to the restriction of their faction’s warband. The model either gains +1
4. The Beast of No Man’s Land
The scent of blood soaking the ground and the incessant sound of gunfire has brought the attention of a prowling beast. Rumours have been spreading about this fiend. Some say it is a stray War Beast, a hell-spawn abomination that escaped captivity before it could be made into a War Wolf. Others claim it is something much older, something that scarred the earth and fed upon its inhabitants long before the start of the war. Whatever it is, the creature knows no bounds and sees neither friend nor foe, only meat.
The Beast must be placed within 6” of a side of the board that is not a Deployment Zone and at least 6” away from a Deployment Zone. The players roll-off to determine on which side of the board the creature will appear. The winning player chooses the board side and the losing player places the creature where they deem fit, according to the parameters above.
Note that the Beast cannot be initially placed anywhere within 12” of a warband model.
At the end of each of a model’s Activation, the player must roll 1D6. On a roll of 1-4, the Beast is Activated subsequently, before the opponent activates one of their own models. The same player then acts out the Beast’s actions, as described in its profile. If by the end of the turn the Beast hasn’t been activated, it is before the start of the next turn. The Beast can only be Activated once per turn. Below is the Beast’s profile and special rules:

The Beast model can be up to 60mm tall, placed on a base of 120 x 80mm. It is armed only with its vicious Claws and devastating Bite. These are natural parts of the creature itself and cannot be removed or lost in any way.
The Beast will seek out the nearest model with the most
When the Beast reaches a model, it will make one attack
Claws
| Range | Melee |
| Hands | 2 Hands (Melee) |
| Modifiers | +1D to Injuries |
RISKY
The Beast treats its Claws as a two-handed melee weapon with the Keyword
Bite
| Range | Melee |
| Modifiers | +1D to Hit, +1D to Injuries, Ignore Armour |
The Beast treats its Bite as a melee weapon that grants a
5. Rat Frenzy
Rats have infested the trenches ever since the start of the war. Troops wake up to the skittering of their little paws, the grinding of their teeth gnawing and tearing at the dead, and even swarming upon the living when the rotten flesh runs low and dry from the bones of the fallen. The sounds of gunfight, the bombs detonating upon the ground, the spreading of smoke and ash, and the disturbance of the troops storming the shore has stirred the rats’ nest and the pests now scurry out of their holes in a ravenous frenzy, feeding on anything that stands in their way.
Use two templates of 80mm to represent the Swarms of Rats. Use two Swarm of Rats’ models if you have them. The players roll-off to place each Swarm of Rats on the board. The Swarms must be placed within 8” of any piece of terrain, including terrain within Deployment Zones, but cannot be placed over Impassable terrain or surrounded by it, and cannot be placed directly on top of another model or in base contact with them. The Swarms must be placed at least 3” away from any warband model.
The Swarms are considered Dangerous Terrain, with
If a model armed with a weapon, or that has an ability with the Keyword
If successful, remove the Swarm from the game board and the Activation of the model is over regardless of any remaining
Each Swarm moves 2D6” at the start of each combat turn, before the Activation of any model. They will always move toward the nearest model that is knocked Down or toward the nearest model that is not engaged in melee combat and that is at least 6” away from any other model. The Swarms cannot move toward a model that causes
The Swarms cannot be engaged in any form of combat. The Swarms will stay for D3 turns after which the rats will scurry back to their holes and disappear.
6. Long Lost Stash
The constant bombardment over the shore uncovers long lost stashes, containing several weapons and items, the spoils of war. Each player places one Objective Marker to represent these stashes to a total of two, each at least 8” away from any Deployment Zone, at least 8” away from each other and at least 6” away from any model. The stashes cannot be placed on impassable terrain or surrounded by it.
A model that comes into base contact with the stash claims it. The model’s owner rolls 1D6 for a chance to get one of the following items:
| 1 | Trench Shield |
| 2 | Standard Armour |
| 3 | Frag Grenades |
| 4 | Medi-Kit |
| 5 | Armour-Piercing Bullets |
| 6 | Grenade Launcher |
The model that claims the stash may immediately equip the item they have looted for the duration of this game.
Glorious Deeds
Players score one Glory Point for every model that completes any of the following Glorious Deeds. Glory Points for these can only be gained once – whichever player completes them first gets the Glory Points!
